Jobs Scheduling with SLURM
The ML Cloud can be accessed through a dedicated set of login nodes used to write and compile applications as well as to perform pre- and post-processing of simulation data. Access to the compute nodes in the system is controlled by the workload manager.
On the ML Cloud the Slurm (Simple Linux Utility for Resource Management) Workload Manager, a free open-source resource manager and batch system, is employed. Slurm is a modern, extensible batch system that is widely deployed around the world on clusters of various sizes.
This page describes how you can run jobs and what to consider when choosing SLURM parameters. You submit a job with its resource request using SLURM, SLURM allocates resources and runs the job, and you receive the results back. There are interactive modes available. Slurm:
- It allocates exclusive or non-exclusive access to the resources (compute nodes) to users during a limited amount of time so that they can perform they work
- It provides a framework for starting, executing and monitoring work
- It arbitrates contention for resources by managing a queue of pending work.
- It permits to schedule jobs for users on the cluster resource
A Slurm installation consists of several programs and daemons. The slurmctld daemon is the central portion of the batch system responsible for monitoring the available resources and scheduling batch jobs. The slurmctld runs on an management node with a special setup to ensure availability in the case of hardware failures. Most user programs such as srun, sbatch, salloc and scontrol interact with the slurmctld. For the purpose of job accounting slurmctld communicates with the slurmdbd database daemon. Information from the accounting database can be queries using the sacct command. Slurm combines the functionality of the batch system and resource management. For this purpose Slurm provides the slurmd daemon which runs on the compute nodes and interacts with slurmctld.
Slurm Partitions
In Slurm multiple nodes can be grouped into partitions which are sets of nodes aggregated by shared characteristics or objectives, with associated limits for wall-clock time, job size, etc. These limits are hard limits for the jobs and can not be overruled. In practice, these partitions can be used by the user to signal a need for resources that have certain hardware characteristics (cpu-only, large memory, GPU type) or that are dedicated to specific workloads (large production jobs, small debugging jobs, interactive, etc.). ML Cloud has implemented several production queues.
See Galvani's Partitions See Ferranti's 1's Partitions
Preemptable partitions
These are cheap partitions where jobs will only cost 25% compared to their non-preemptable counterparts. But in these partitions your job may be canceled or requeued if a job in a non-preemptable partition requires resources. Preempted jobs are requeued by default. When a job is requeued, the batch script is initiated from its beginning. If you do not desire this please set the --no-requeue sbatch option in your job submission scripts. If you set this option your job will just be cancelled.
Job cost
The cost of your job is calculated as the maximum of the cost of the resources you consume. For example if you submit job to the gpu-2080ti partition that used 10 CPUs, 50G RAM, 1 GPU then:
cost=MAX(10 * 0.278,50 * 0.0522,1 * 2.5)=2.78
These costs will be used to calculate your fairshare.
Accounting and fairshare will be based on the amount of resources you are blocking and not on what you reserve:
E.g. requesting #v100=1 and #cpu=64 will still charge you the equivalent of a whole V100 node.
Quality of Service (QoS)
Quality of Services are the most versatile way of setting specific privileges, but also limits, to users and jobs, dictating the limit in the resources and partitions that a job is entitled to request.
Each partition of the clusters can be associated with a QoS, from which it will inherit all limits.
Login Nodes
When you login to the ML Cloud system you land on a login node. The login nodes are shared resources: at any given time, there are many users logged into each of these login nodes, each preparing to access the "back-end" compute nodes (Figure 2. Login and Compute Nodes). What you do on the login nodes affects other users directly because you are competing for the same resources: memory and processing power. This is the reason you should not run your applications on the login nodes or otherwise abuse them. Think of the login nodes as a prep area where you can manage files and compile code before accessing the compute nodes to perform research computations. See Good Conduct for more information.
Figure 2. Login and Compute Nodes
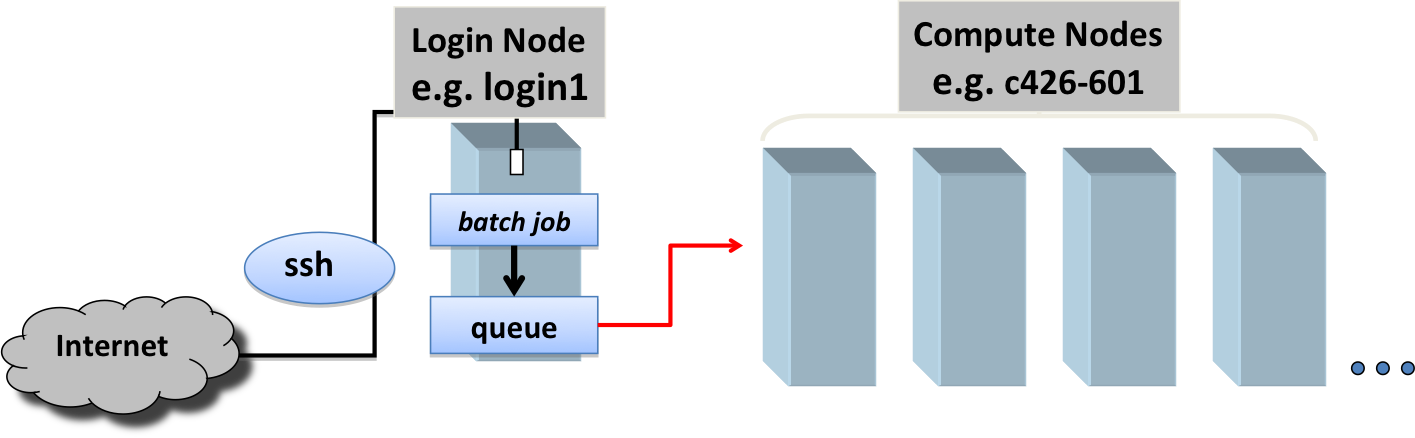
Login and Compute Nodes
To discern whether you are on a login node or a compute node use the command-line prompt, or the hostname command. The hostname for a ML Cloud login node has a string login (e.g. galvani-login), while compute node hostnames will start with the name of the cluster and a number (e.g. galvani-cn).
Allocations, Jobs and Job Steps
In Slurm a job is an allocation of selected resources for a specific amount of time. A job allocation can be requested using sbatch and salloc. Within a job multiple job steps can be executed using srun that use all or a subset of the allocated compute nodes. Job steps may execute at the same time if the resource allocation permits it. A user job is characterized by:
* number of computing resources: nodes (including all their CPUs and cores) or CPUs (including all their cores) or cores
* amount of memory: either per node or per CPU
* (wall)time needed for the users tasks to complete their work
* the launcher script, which will initiate your tasks
There are everal ways of submitting jobs with slurm, using either sbatch, srun or salloc:
-
Submit a batch job using the
sbatchcommand. This directs the scheduler to run the job unattended when there are resources available. Until your batch job begins it will wait in a queue. You do not need to remain connected while the job is waiting or executing. Note that the scheduler does not start jobs on a first come, first served basis; it juggles many variables to keep the machine busy while balancing the competing needs of all users. The best way to minimize wait time is to request only the resources you really need: the scheduler will have an easier time finding a slot for the two hours you need than for the 24 hours you unnecessarily request. -
Begin an interactive session using
sshto connect to a compute node on which you are already running a job. This is a good way to open a second window into a node so that you can monitor a job while it runs. -
Begin an interactive session using
srun. This will log you into a compute node and give you a command prompt there, where you can issue commands and run code as if you were doing so on your personal machine. An interactive session is a great way to develop, test, and debug code. Thesruncommand submits a new batch job on your behalf, providing interactive access once the job starts. You will need to remain logged in until the interactive session begins. -
sallocis used to allocate resources for a job in real time. Typically this is used to allocate resources (nodes, tasks, partition, etc.) and spawn a shell. The shell is then used to execute srun commands to launch parallel tasks.
Job submission options
There are several useful environment variables set be Slurm within an allocated job. The most important ones are detailed in the below table which summarizes the main job submission options offered with {sbatch | srun | salloc}.
You can pass options using either the command line or job script; most users find that the job script is the easier approach. Slurm directives begin with #SBATCH; most have a short form (e.g. -N) and a long form (e.g. --nodes).
| Option | Argument | Comments |
|---|---|---|
--partition |
queue_name | Submits to queue (partition) designated by queue_name |
-nodes |
nodes | Define, how many nodes you need. |
--ntasks |
tasks | Number of tasks |
--gres |
gpu:N | request GPUs type and number of resouces |
--job-name |
job_name | Give your job a name, so you can recognize it in the queue overview |
--output |
output_file | Direct job standard output to output_file (without -e option error goes to this file. Make sure this is not on $HOME |
--error |
error_file | Direct job error output to error_file. Make sure this is not on $HOME |
--time |
D-HH:MM | Wall clock time for job. |
--mem |
#G | Memory pool for all cores (see also --mem-per-cpu) |
--mail-type |
BEGIN,END,FAIL,ALL |
Specify when user notifications are to be sent (one option per line). |
--mail-user |
user@uni-tuebingen.de | Email to which notifications will be sent |
--constraint |
ImageNetC, ImageNet2012, ImageNetR, ffcvImageNet, nodata |
deployed some commonly used datasets locally on comput nodes on select partitions. |
By default, Slurm writes all console output to a file named slurm-%j.out, where %j is the numerical job ID. To specify a different filename use the -o option. To save stdout (standard out) and stderr (standard error) to separate files, specify both -o and -e.
Writing a Batch Script
Users submit batch applications (usually bash scripts) using the sbatch command. The first line of your job script must specify the interpreter that will parse non-Slurm commands; in most cases #!/bin/bash or #!/bin/csh is the right choice. All #SBATCH directives must precede all shell commands. Note also that certain #SBATCH options or combinations of options are mandatory (see table above for the list of common environmental variables):
#!/bin/bash
#SBATCH --ntasks=1                 # Number of tasks (see below)
#SBATCH --cpus-per-task=1          # Number of CPU cores per task
#SBATCH --nodes=1                  # Ensure that all cores are on one machine
#SBATCH --time=0-00:05             # Runtime in D-HH:MM
#SBATCH --gres=gpu:2               # optionally type and number of gpus
#SBATCH --mem=50G                  # Memory pool for all cores (see also --mem-per-cpu)
#SBATCH --output=hostname_%j.out   # File to which STDOUT will be written - make sure this is not on $HOME
#SBATCH --error=hostname_%j.err    # File to which STDERR will be written - make sure this is not on $HOME
#SBATCH --mail-type=END            # Type of email notification- BEGIN,END,FAIL,ALL
#SBATCH --mail-user=user@abc.com   # Email to which notifications will be sent

# insert your commands here
....................
Job Script Examples (MORE ADDED HERE)
Once you have created your script, you can use Slurm's sbatch command to submit a batch job to one of the ML Cloud queues:
sbatch -p 2080-galvani test.sh
Here test.sh is the name of a text file containing #SBATCH directives and shell commands that describe the particulars of the job you are submitting. The details of your job script's contents depend on the type of job you intend to run. -p 2080-galvani specifices the partition (queue) under which the script will be run.
In each job script:
- use
#SBATCHdirectives to request computing resources (e.g. 10 nodes for 2 hrs); - then, list shell commands to specify what work you're going to do once your job begins.
There are many possibilities: you might elect to launch a single application, or you might want to accomplish several steps in a workflow. You may even choose to launch more than one application at the same time. The details will vary, and there are many possibilities. But your own job script will probably include at least one launch line that is a variation of one of the examples described here.
See the customizable job script examples.
Your job will run in the environment it inherits at submission time; this environment includes the specific execution directives and the current working directory. You can of course use your job submission script to modify this environment by defining new environment variables; changing the values of existing environment variables; changing directory; or specifying relative or absolute paths to files.
Consult the Common sbatch Options table below describes some of the most common sbatch command options. Slurm directives begin with #SBATCH; most have a short form (e.g. -N) and a long form (e.g. --nodes). You can pass options to sbatch using either the command line or job script; most users find that the job script is the easier approach.
Common SLURM commands
| Command | Function |
|---|---|
sbatch |
Submit a batch job script. The command exits immediately when the script is transferred to the Slurm controller daemon and assigned a Slurm job ID. |
sacct |
Used to query past jobs. |
squeue |
Print table of submitted jobs and their state. |
sinfo |
Provide overview of cluster status. |
scancel |
Cancel a job prior to its completion. |
seff jobid |
Reports the computational efficiency of your calculations. |
sacctmgr |
with show associations user=username find out what account(s) your usesrname is associated with. |
scontrol show partitions |
detailed information about all available partitions and their definition/limits. |
sprio -w |
The weights for the prioritization can be found by running the sprio -w command. |
sshare |
The command shows how many shares your group has as well as your fairshare value |
Cluster status
The command sinfo provides status information of nodes in various partitions (also the associated time limit for each partition). The default partition is marked with an "*". This information can be useful in deciding where to submit your job. Status codes (abbreviated form) are explained below:
| Status Code | Description |
|---|---|
alloc |
The node has been allocated to one or more jobs. |
mix |
The node has some of its CPUs ALLOCATED while others are IDLE. |
idle |
The node is not allocated to any jobs and is available for use. |
down |
The node is down and unavailable for use. |
drain |
The node is unavailable for use per system administrator request. (for maintenance etc.) |
drng |
The node is being drained but is still running a user job. The node will be marked as drained right after the user job is finished. Do not worry if you have a job running on a node with this state. |
Monitor Your Job
Once submitted, the job will be queued for some time, depending on how many jobs are presently submitted. Eventually, more or less after previously submitted jobs have completed, the job will be started on one or more of the nodes determined by its resource requirements. The status of the job can be queried with the squeue command.
| Option | Description |
|---|---|
-a |
Display information for all jobs. |
-j jobid |
Display information for the specified job ID. |
-j jobid -o %all |
Display all information fields (with a vertical bar separating each field) for the specified job ID. |
-l |
Display information in long format. |
-n job_name |
Display information for the specified job name. |
-t state_list |
Display jobs that have the specified state(s). Valid jobs states include PENDING, RUNNING, SUSPENDED, COMPLETED, CANCELLED, FAILED, TIMEOUT, NODE_FAIL, PREEMPTED, BOOT_FAIL, DEADLINE, OUT_OF_MEMORY, COMPLETING, CONFIGURING, RESIZING, REVOKED, and SPECIAL_EXIT. |
-u username |
Display jobs owned by the specified user. |
For example, to see pending jobs for a particular user:
squeue -u mfa608 -t PENDING
You can use sacct to get details of a previously run job:
sacct -j 15370
or
sacct -j 15370 --format JobID,JobName,Partition,Account,AllocCPUS,State,ExitCode,NodeList
Be sure to distinguish between internal Slurm replacement symbols (e.g. %j described above) and Linux environment variables defined by Slurm (e.g. SLURM_JOBID). Execute env | grep SLURM from within your job script to see the full list of Slurm environment variables and their values. You can use Slurm replacement symbols like %j only to construct a Slurm filename pattern; they are not meaningful to your Linux shell. Conversely, you can use Slurm environment variables in the shell portion of your job script but not in an #SBATCH directive. For example, the following directive will not work the way you might think:
#SBATCH -o myProgram.o${SLURM_JOB_ID}# incorrect
Instead, use the following directive:
#SBATCH -o myProbgram.o%j # "%j" expands to your job's numerical job ID
For more information on this and other matters related to Slurm job submission, see the Slurm online documentation; the man pages for both Slurm itself (man slurm) and its individual commands (e.g. man sbatch); as well as numerous other online resources.
Using srun --pty bash
srun uses most of the options available to sbatch. When the interactive allocation starts, a new bash session will start up on one of the granted nodes:
[mfa608@galvani-login ~]$ srun --job-name "InteractiveJob" --ntasks=1 --nodes=1 --time 1:00:00 --pty bash
Using Salloc
salloc functions similar to srun --pty bash in that it will add your resource request to the queue. However once the allocation starts, a new bash session will start up on the login node. To run commands on the allocated node you need to use srun.
If you connection is lost for some reason you can use salloc --no-shell to resume shell/jobs sessions.