Containers
To ensure your results are reproducible and verifiable, use containers to package your research projects. Containers include an entire operating system, GPU libraries, etc., so this page discusses what a container is and how to work with our Singularity container system.
Reasons to Use Containers
Software has grown in complexity over the years making it difficult at times to install and run the software. Containers address this problem by storing the software and all of its dependencies (including a minimal operating system) in a single, large image so that there is nothing to install and when it comes time to run the software everything "just works". This makes the software both shareable and portable while the output becomes reproducible.
- A Singularity image bundles an application together with its software dependencies, data, scripts, documentation, license and a minimal operating system. Software in this form ensures reproducible results.
-
Singularity images are stored as a single file which makes them easily shareable.
-
A Singularity image can run on any system that has the same architecture (e.g., x86-64) and binary file format for which the image was made. This provides portability.
-
Bring Your Own Software (BYOS). That is, you don't have to ask the system adminstrators if they are willing to install something for you. You can install whatever you want inside the image and then run it. This is because there is no way to escalate priviledges. That is, the user outside the container is the same user inside so there are no additional security concerns with containers.
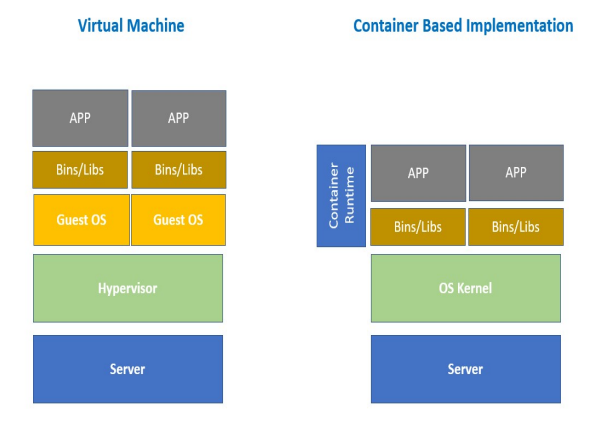
Differences between Virtual Machines and Containers
| Container | VM |
|---|---|
| OS process level isolation | OS level isolation with virtualized hardware |
| Can run 1,000s on a single machine | Can run “dozens” on a single machine. |
| Leverages kernel features (requirements on kernel version) | Leverages hypervisors (requirements on hardware) |
| Start up time ~100s of ms | Start up time ~minutes |
Singularity
Docker images are not secure because they provide a means to gain root access to the system they are running on. This is not a problem because you can use Singularity which is an alternative to Docker that is both secure and designed for high-performance computing. Singularity is compatible with all Docker images and it can be used with GPUs and MPI applications, as well as Infiniband networks.
Singularity is already installed globally on all our systems, and should be immediately available on your command line (no module load necessary):
singularity --version
If you want to use Docker and other format containers they need to be converted to singularity format for use on the cluster.
GPU support for containers
Commands that run, or otherwise execute (singularity) containers (shell, exec) can take an --nv option, which will setup the container’s environment to use an NVIDIA GPU and the basic CUDA libraries to run a CUDA enabled application. The --nv flag will:
- Ensure that the
/dev/nvidiaXdevice entries are available inside the container, so that the GPU cards in the host are accessible. - Locate and bind the basic CUDA libraries from the host into the container, so that they are available to the container, and match the kernel GPU driver on the host.
- Set the
LD_LIBRARY_PATHinside the container so that the bound-in version of the CUDA libraries are used by applications run inside the container.
Converting docker to singularity images
There are (at least) 2 options for converting docker images to singularity dockers.
Use Singularity
If you want to convert a docker image called ubuntu with the tag latest to a singularity file called IMAGE_NAME.sif, just run this command:
singularity build IMAGE_NAME.sif docker://ubuntu:latest
You can execute this command on the login nodes, as well as on any of the compute nodes of the SLURM cluster. Also, you can find more information here.
Use docker2singularity
If you have access to a computer with docker installed (and running) you can also use the singularity2docker tool for converting your images.
To convert the ubuntu image to singularity (as above) use:
docker run -v /var/run/docker.sock:/var/run/docker.sock \
  -v /tmp/test:/output \
  --privileged -t --rm \
  quay.io/singularity/docker2singularity \
  ubuntu:latest
This will create a *.simg file you can then transfer to a ML-Cloud server.
By itself this is more complicated then the first method,
but it can become necessary if you want to make adjustements to a container that are difficult to reproduce in a singularity recipe.
You can find more about singularity2docker usage on github.
Singularity on ML Cloud Example
Set the cache and tmp directories for singularity
This is required to build the container, as otherwise storage can be insufficient and result in a build failure.
 export SINGULARITY_CACHEDIR=/scratch_local/group-name/your-username
 export SINGULARITY_TMPDIR=/scratch_local/group-name/your-username
Singularity by default mounts these 5 folders from the host filesystem into the container filesystem:
/home/$USER
/tmp
/dev
/sys
/proc
so if your script or data is in one of these folders then you don't need manual mounting and can simply specify the path to the files to singularity commands.
Build the Image
To build an image without root privileges, use --fakeroot, e.g. as in
singularity build --fakeroot IMAGE_NAME.sif DEFINITION_NAME.def
 ```

Where `DEFINITION_NAME.def` is the definition file and `IMAGE_NAME.sif` the image file.

```console
/dev
/sys
/proc
so if your script or data is in one of these folders then you don't need manual mounting and can simply specify the path to the files to singularity commands.
An example singularity definition file with dropbear SSH
The following example has been provided by the Bethge/Brendel on-boarding notion documentation.
Bootstrap: docker
From: nvidia/cuda:11.3.0-cudnn8-runtime-ubuntu20.04

%environment
    # overwrite Singularity prompt with something more usefu
    export PS1="\u@\h \W§ "

%files
    # copy the dropbear keys into the container (for ssh)
    /mnt/qb/work/<group-name>/<username>/dropbear /etc/dropbear

    # project requirement file
    ./path/to/requirements.txt

%post
    # required to indicate that no interaction is required for installing packages with apt
    # otherwise, installing packages can fail
    export DEBIAN_FRONTEND=noninteractive


    apt-get -qq -y update

    # apt-get install -y build-essential cmake git rsync

    apt-get install -y python3 python3-pip python3-wheel python3-yaml intel-mkl-full

    # ssh client for the vs code setup
    apt-get install -y dropbear
    chmod +r -R /etc/dropbear

    apt-get clean

    # project requirements install
    pip3 install -r requirements.txt
Install matlab into docker/singularity images
 # --- MATLAB ---
ENV MATLAB_RELEASE=r2022a

# required packages depend a bit on which matlab toolboxes are required
RUN apt-get update \
 && apt-get install -yq --no-install-recommends \
   libxt6 \
   libx11-6 \
 && apt-get clean && rm -rf /var/lib/apt/lists/* \
 && locale-gen "en_US.UTF-8"

`# Run mpm to install MATLAB in the target location and delete the mpm installation afterwards.
`# If mpm fails to install successfully then output the logfile to the terminal, otherwise cleanup.
`# see https://de.mathworks.com/products.html for available products
RUN wget -q https://www.mathworks.com/mpm/glnxa64/mpm \
    && chmod +x mpm \
    && ./mpm install \
    --release=${MATLAB_RELEASE} \
    --destination=/opt/matlab \
    --products MATLAB Deep_Learning_Toolbox Parallel_Computing_Toolbox Statistics_and_Machine_Learning_Toolbox Optimization_Toolbox Image_Processing_Toolbox \
    || (echo "MPM Installation Failure. See below for more information:" && cat /tmp/mathworks_root.log && false) \
    && rm -f mpm /tmp/mathworks_root.log \
    && ln -s /opt/matlab/bin/matlab /usr/local/bin/matlab

ENV MLM_LICENSE_FILE=put_license_file
ENV MW_DDUX_FORCE_ENABLE=true MW_CONTEXT_TAGS=MATLAB:DOCKERFILE:V1
This example was kindly provided by Matthias Kümmerer.